Are you tired of the clutter in your garage? This guide will show you how to build a sturdy DIY garage bench. It’s perfect for both seasoned DIYers and beginners. We’ll cover everything from picking the right materials to putting it all together.
Key Takeaways
- Discover the benefits of a sturdy garage bench for your DIY projects and workspace organization
- Learn about the different types of garage benches and choose the one that best fits your needs
- Gather the essential tools and materials required to build your own DIY garage bench
- Follow the step-by-step instructions to construct the frame and assemble the top of your garage bench
- Explore options for adding storage and organization to your custom garage bench
Introduction to Garage Benches
A garage bench is key for any good workshop or garage. It gives a solid, big space for many DIY tasks. This includes woodworking, car repairs, and keeping things organized. A strong garage workbench boosts your work speed and makes your space more efficient.
Benefits of a Sturdy Workbench
A good garage bench brings many benefits to DIY projects. Some main benefits of a garage bench are:
- More space for projects and repairs
- Better organization and storage
- More safety and stability
- Work faster and more efficiently
Types of Garage Benches
There are many garage benches to pick from, each with special features. Here are some common types of garage benches:
- Workbench with storage: These have drawers, shelves, or cabinets for tools and materials.
- Portable garage bench: Light and easy to move, perfect for changing your workspace.
- Heavy-duty industrial bench: Built for tough tasks, strong and can handle a lot of weight.
- Specialized benches: Made for specific tasks like car repairs or woodworking.
Choosing the right garage bench depends on your space, projects, and what you like. Think about the benefits of a garage bench and the different types of garage benches. This way, you can make a space that helps you with your DIY projects.
Planning Your DIY Garage Bench
Before starting your DIY garage bench project, planning is key. Measure your space, decide on the bench’s size and height, and choose its design and features. These steps are crucial for a successful project.
Measuring Your Garage Space
Start by measuring your garage’s available space. Take precise measurements of the area for your bench. Focus on length, width, and height to find the bench’s maximum size.
Choosing the Right Size and Height
After measuring, plan your bench’s size and height. Think about the tasks and tools you’ll use. Bench heights usually range from 30 to 36 inches, but you can adjust it to fit your needs.
Designing the Bench Features
With dimensions in hand, design your bench. Will it have shelves, drawers, or other storage? Choose a style and finish that looks good and works well. Plan carefully to make your bench both useful and attractive.
“The key to a successful DIY garage bench project is thorough planning and attention to detail.”
By planning well, you’ll make building your bench easier and more rewarding. Your bench will meet your needs and improve your workspace.
Essential Tools and Materials
Building a strong and useful garage bench needs the right tools and materials. Whether you’re experienced in DIY or new to woodworking, having the right tools for building a garage bench and materials for a DIY garage bench is key. This ensures your project will be a success.
Woodworking Tools Needed
To make your garage bench, you’ll need basic woodworking tools. Here’s what you’ll need:
- Circular saw or miter saw for cutting lumber to size
- Power drill or impact driver for drilling holes and driving screws
- Orbital sander or palm sander for smoothing the surfaces
- Clamps to hold the pieces in place during assembly
- Measuring tape, pencil, and square for accurate measurements
Materials for Your Garage Bench
The essential supplies for a garage bench include:
| Material | Quantity | Purpose |
|---|---|---|
| Solid wood lumber (e.g., pine, oak, or maple) | Varies based on bench size | For the frame and top |
| Wood glue | 1-2 bottles | Bonding the wood components |
| Screws (1-1/4″ to 2-1/2″ in length) | Approx. 20-30 screws | Securing the frame and top |
| Wood finish (e.g., polyurethane, stain, or paint) | 1 can | Protecting and enhancing the appearance |
With the right tools for building a garage bench and the necessary materials for a DIY garage bench, you’re ready to start. You’ll create a sturdy, reliable workspace in your garage.
Step-by-Step Instructions
Building a DIY garage bench is a step-by-step process. It ensures your bench is sturdy and lasts long. Let’s explore how to build a garage bench, from the frame to the top.
Building the Frame
The frame is the base of your garage bench. Begin by measuring and cutting wood for the legs, stretchers, and supports. Assemble the frame using wood glue and screws. Make sure it’s square and level before moving on.
Assembling the Top
Now, focus on the bench top. Measure and cut wood boards for the top, fitting them to the frame. Apply wood glue to the frame and place the top boards, aligning them. Secure the top with screws or nails, ensuring it’s smooth and even.
By following these steps, you’ll create a sturdy and functional garage bench. Take your time, double-check measurements, and always prioritize safety.
how to build a garage bench
Building a DIY garage bench is a rewarding project. It can transform your workspace and boost your productivity. This guide will help you create a sturdy, customized garage workbench that fits your needs.
To start, you’ll need the right tools and materials. You’ll need basic woodworking tools like a saw, drill, and screwdriver. Also, gather the lumber, plywood, and hardware needed for your bench. With these items, you’re ready to begin.
- First, measure the space in your garage and decide on the bench’s size. This step helps you plan and ensure the bench fits perfectly.
- Then, cut the wood to the right lengths with your saw. Make sure to measure and mark each piece accurately.
- Build the bench’s frame using the cut pieces. Use screws or nails to hold it together. Make sure it’s sturdy and level.
- Attach the tabletop to the frame. Use plywood or durable materials for a smooth, level surface.
- Think about adding extra features like shelves, drawers, or pegboards. These can make your bench more functional and organized.
Take your time and follow the instructions carefully. Double-check your measurements for a professional-looking bench. With some effort and creativity, you can turn your garage into a well-organized workspace for all your DIY projects.
“Building a garage bench is a game-changer for any DIY enthusiast. It provides a dedicated workspace and helps keep your tools and supplies organized, making your projects easier and more efficient.”
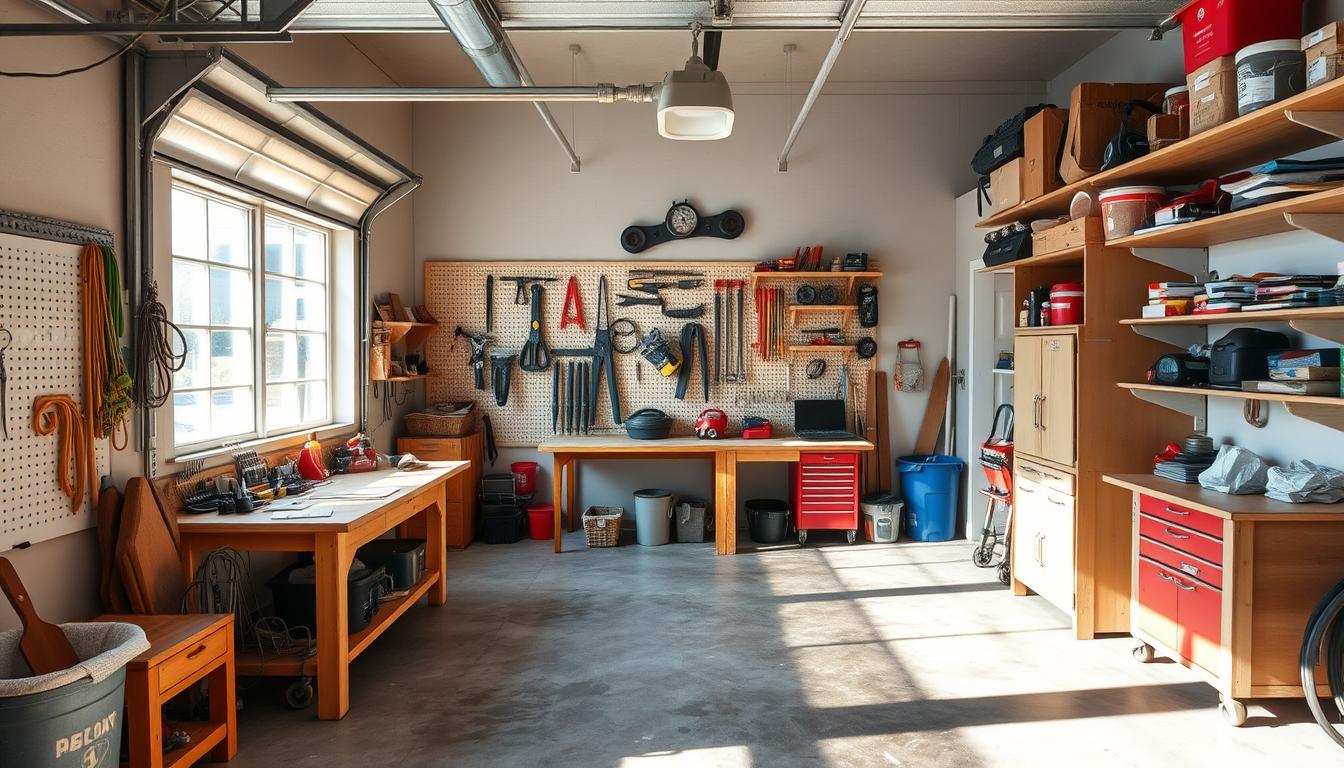
Adding Storage and Organization
Turning your DIY garage bench into a useful space is more than just building it. Adding smart storage and organization is crucial. You can use shelves, drawers, hooks, and pegboards to keep things tidy and within reach.
Shelves and Drawers for Garage Bench Storage
Adding shelves and drawers to your bench is a smart move. Shelves are great for items you use often. Drawers are perfect for smaller tools and hardware. Plan your storage based on what you need to keep organized.
- Incorporate adjustable shelves to accommodate a variety of items
- Utilize deep drawers for bulkier items and shallow drawers for smaller objects
- Choose high-quality drawer slides and hardware for smooth, reliable operation
With shelves and drawers, your bench becomes a hub for organization. It keeps your workspace clean and your tools handy.

“A well-organized garage bench can make all the difference in your productivity and efficiency.”
Creating effective DIY garage bench storage means designing for your needs. Try out different setups to find the best garage bench organization for you.
Finishing Touches
After building your DIY garage bench, it’s time to add the final touches. You can pick the perfect stain or paint color. You can also add personal touches like custom logos or artwork. These steps will make your bench look professional and polished.
First, choose a finish that fits your garage’s look. Garage bench finishing touches can be a classic wood stain or a bold paint color. If you like to DIY garage bench decor, think about adding metal brackets, leather accents, or a custom plaque.
- Explore a variety of wood stains and paint colors to find the perfect match for your space
- Add personalized touches like custom logos, artwork, or engraved nameplates
- Incorporate hardware and accessories that reflect your personal style
Personalizing your garage bench is all about having fun and being creative. You can go for a minimalist or rustic look. The finishing touches will make your bench unique, showing off your personality and style.
| Garage Bench Finishing Touches | Benefits |
|---|---|
| Wood Stain | Enhances the natural beauty of the wood and protects the surface |
| Custom Paint Color | Allows you to create a unique, personalized look for your garage bench |
| Decorative Hardware | Adds visual interest and a touch of style to your DIY garage bench |
| Engraved Nameplate | Adds a personal, customized touch to your garage workspace |
The finishing touches on your DIY garage bench are a chance to show off your style. They turn your garage into a unique and functional space. It’s a place you’ll be proud to own.
Maintenance and Care
Keeping your DIY garage bench in top shape is key to its long life and good performance. By following a few easy steps, you can keep your workbench looking great and working well for years.
Cleaning and Protecting Your Bench
Regular cleaning is crucial for your garage bench’s look and durability. Begin by wiping the surface with a clean, damp cloth to remove dirt, debris, or spills. For stubborn stains or grime, a mild soap and water mix works well. But, steer clear of harsh chemicals or abrasive cleaners to avoid damage.
After cleaning, apply a wood sealant or furniture polish to protect it. This creates a shield against wear and tear, preventing moisture and discoloration. Follow the manufacturer’s advice for when to reapply, usually every few months or as needed.
| Task | Frequency |
|---|---|
| Wipe down the surface | Weekly |
| Deep clean with mild soap and water | Monthly |
| Apply wood sealant or furniture polish | Every 3-6 months |
Stick to this care routine to keep your garage bench in top condition. This ensures it stays a reliable and efficient workspace for your DIY endeavors.

“A well-maintained garage bench is the foundation of a productive and organized workspace.”
Garage Bench Inspiration
Looking for ideas to create your dream DIY garage bench? You’re in the right spot. This section highlights various real-world examples and creative projects. You’ll find everything from sleek modern designs to rustic and industrial benches.
Check out these garage bench design ideas:
- A minimalist, floating-style bench with built-in storage drawers for a clean, contemporary look.
- A sturdy, heavy-duty workbench crafted from reclaimed wood, perfect for a rustic or farmhouse-inspired garage.
- An L-shaped bench with integrated shelves and pegboard for optimal organization and accessibility.
- A mobile, height-adjustable bench on casters for easy maneuvering around the garage.
- A custom-built bench with a butcher block top and industrial-style metal legs for a sleek, industrial vibe.
These DIY garage bench examples show the endless possibilities for custom garage bench projects. Whether you like modern, traditional, or whimsical designs, there’s a garage bench design idea for everyone.
“The great thing about building your own garage bench is that you can tailor it to your specific space and requirements. It’s a chance to get creative and make it truly your own.”
So, get inspired and start planning your dream DIY garage bench today! With creativity and the right tools, you can turn your garage into a functional and stylish workspace.
Conclusion
Building a DIY garage bench is a rewarding project. It can change your workspace and make your garage more useful. We’ve shown you how to plan, build, and finish your bench.
Creating a garage bench can help you work better, store things better, or make your garage look nicer. This guide has given you the tools to make your own bench. Now, you can make your garage space better.
Start your project with patience, focus on details, and a desire to learn. With the right tools, materials, and a clear plan, you can make a bench that lasts. Enjoy making your garage bench!