Floating shelves are a hit for storing things in any room, like the living room or garage. They’re sleek and simple, making it easy to show off your stuff while saving wall space. But, it’s key to make sure your shelves are well-supported to keep them safe and lasting long.
In this guide, we’ll show you how to make strong DIY garage floating shelves. These shelves can hold heavy items without a problem.
Key Takeaways
- Understand the benefits of floating shelves for your garage or workspace
- Learn how to measure and select the right size floating shelves for your space
- Discover the essential tools and materials needed for a successful DIY floating shelf project
- Explore techniques for securely mounting floating shelves to the wall
- Discover ways to add personal touches and maximize storage on your floating shelves
Understanding Floating Shelves
Floating shelves are a trendy way to store things and add style to any room. They look like they’re floating on the wall, giving a clean, modern look. But what are they, and why are they so popular?
What Are Floating Shelves?
Floating shelves are shelves that seem to float on the wall. They’re usually made of wood, metal, or a mix of both. They’re attached to the wall with hidden brackets or special mounts. This creates a neat, uncluttered look that’s perfect for homes or offices.
Benefits of Floating Shelves
Floating shelves have many benefits that make them a favorite among homeowners and designers. Some of the main advantages include:
- Increased storage space: They use wall space that’s otherwise wasted, offering extra storage and display areas.
- Minimalist design: Their design, without visible supports, adds a modern touch that fits many decorating styles.
- Customizable: You can find floating shelves in many sizes, materials, and finishes to match your space.
- Easy installation: They’re simpler to put up than regular shelves, making them a great DIY project.
In summary, floating shelves are a smart and stylish way to improve any room. They’re great for showing off your favorite items or for extra storage. They’re definitely worth considering for your next home improvement project.
Planning Your Floating Shelf Project
Before starting your DIY floating shelf project, it’s key to plan and measure well. This ensures the shelves fit perfectly and look great in your room. We’ll cover how to measure and select the right size for your needs. Plus, we’ll talk about choosing the right materials for a strong and stylish installation.
Measuring and Selecting the Right Size
Getting accurate measurements is the first step to a successful floating shelf project. Begin by figuring out the wall space for your shelves. Measure the length, height, and depth of the area, considering any obstacles like outlets or switches. This helps you pick the right shelf sizes for a perfect fit.
Think about what you’ll display on the shelves when choosing their size. Measure your items and pick a depth that fits them well. Don’t forget to add extra space for decorations or personal touches.
Choosing the Appropriate Materials
The materials for floating shelves are key for strength and durability. You can choose from solid wood, engineered wood, or metal shelves. Each has its own benefits, like weight capacity, look, and installation ease. Think about these factors when picking your material.
- Solid wood shelves have a classic look and can hold a lot of weight. But, they cost more and need more care.
- Engineered wood, like MDF or particleboard, is cheaper and has many finish options. It’s good for weight and looks.
- Metal shelves, like stainless steel or aluminum, offer a modern look and last long. But, they might need special installation.
Think about your space’s needs and what you like to choose the materials for floating shelves that fit your project best.
Essential Tools and Supplies
Building your own floating shelves needs the right tools and supplies. Whether you’re experienced or new to DIY, the right tools make a big difference. Here’s what you need for your tools for diy floating shelves project.
Tools for DIY Floating Shelves
- Power drill with various drill bits
- Level
- Stud finder
- Measuring tape
- Pencil or marker
- Saw (hand saw, jigsaw, or circular saw)
- Clamps
- Sandpaper (various grits)
- Screwdriver set
- Hammer
Essential Supplies for Floating Shelves
- Floating shelf brackets or supports
- Shelf boards (wood, laminate, or other materials)
- Wood glue
- Wall anchors or screws
- Wood filler (if necessary)
- Sealant or stain (optional)
- Protective eyewear and gloves
Having the right tools for diy floating shelves makes the job easier. Always be safe when using power tools and follow the instructions.
| Tool | Purpose |
|---|---|
| Power Drill | Drilling holes for shelf brackets and wall anchors |
| Level | Ensuring the shelves are perfectly aligned and level |
| Stud Finder | Locating the sturdy wall studs for secure shelf installation |
| Saw | Cutting the shelf boards to the desired size and shape |
| Sandpaper | Smoothing the edges and surfaces of the shelf boards |
With the right tools for diy floating shelves and supplies, you can make beautiful shelves. They will improve your space’s look and organization.
Preparing the Wall for Installation
Getting your wall ready is key for installing floating shelves. You need to find the sturdy wall studs or solid backing. This will give your shelves a strong base.
Locating Studs or Solid Backing
Finding the wall studs is the first step. These vertical supports are best for holding your shelves. Use a stud finder or tap the wall to find them.
If there are no studs, look for solid backing like plywood or drywall. Check your walls to see what works best for your shelves.
- Use a stud finder to find the vertical wall studs.
- Tap the wall to find the solid areas where studs are.
- Look for solid backing like plywood or drywall panels.
- Mark the stud or solid backing spots with a pencil for your installation.
| Step | Description |
|---|---|
| 1. Locate Studs | Use a stud finder tool or tap along the wall to identify the vertical wooden or metal supports. |
| 2. Mark Stud Locations | Use a pencil to clearly mark the positions of the studs on the wall. |
| 3. Identify Solid Backing | Inspect the wall for any solid backing material, such as plywood or drywall panels. |
| 4. Prepare for Installation | Ensure you have the necessary tools and supplies to securely mount your floating shelves. |
By finding the wall studs or solid backing, you can securely mount your shelves. This ensures they can hold your decor and personal items safely.
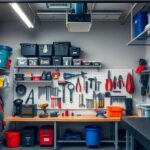
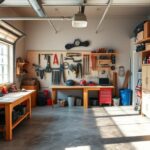
DIY Garage Floating Shelves
Turn your garage into a tidy and useful area with DIY floating shelves. These handy storage options help you use your space better and keep things in order.
Creating floating shelves for your garage requires some planning. First, measure the wall space to make sure the shelves fit right. It’s also important to pick strong materials like wood or metal to hold your items.
- Measure the wall space in your garage to find the perfect size and number of shelves.
- Choose materials that can handle the garage’s weather and weight, like weatherproof wood or metal.
- Plan where to put your shelves for a good look and useful storage.
By following these steps, you can make your garage neat and nice-looking. DIY floating shelves offer lots of storage and add style to your garage, making it a great place to be.
“Investing in DIY floating shelves for my garage was one of the best decisions I made. They’ve helped me keep everything organized and easily accessible.”
With some effort and the right tools, you can make custom shelves that fit your garage perfectly. DIY projects can turn your garage into a neat and efficient space.
Step-by-Step Installation Guide
Installing floating shelves might seem hard, but it’s easier than you think. We’ll guide you through the key steps for a successful installation.
Marking and Drilling Pilot Holes
First, measure and mark where you want your shelves on the wall. Use a stud finder to find the solid wood or metal studs. These spots are best for anchoring.
After finding the studs, mark where to drill pilot holes with a pencil.
- Use a level to make sure your marks are straight and even.
- Drill pilot holes at each marked spot with a power drill and the right drill bit for your brackets.
- Check the depth of the holes to make sure they fit your shelf hardware.
Securing the Shelf Brackets
Now, attach the shelf brackets to the wall. Follow these steps for a solid installation:
- Place the brackets over the pilot holes, making sure they’re level and aligned.
- Secure the brackets to the wall with the screws provided, using a screwdriver or power drill.
- Check if the brackets are stable and adjust if needed before moving on.
By carefully marking, drilling, and securing the brackets, you’ll set up a strong floating shelf installation.

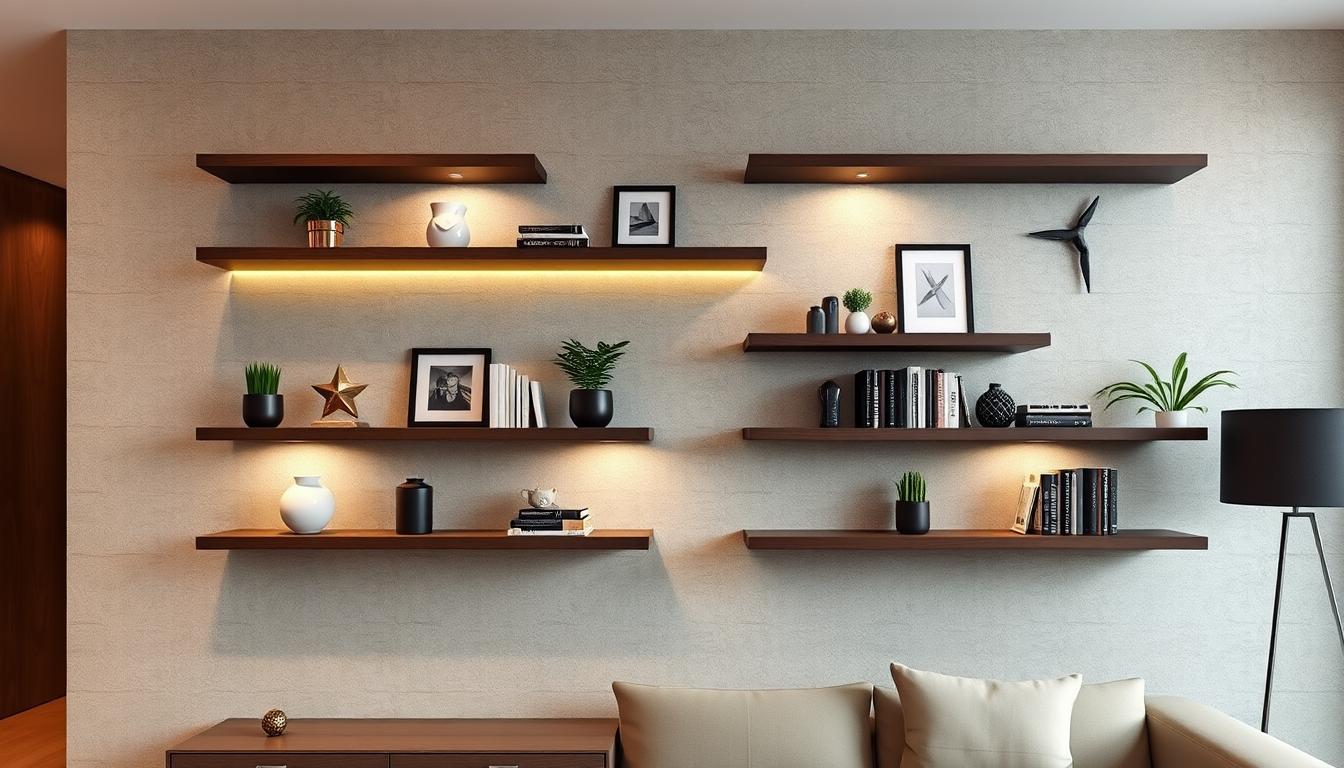
Adding Decorative Touches
After installing your floating shelves, you can make them your own. Painting or staining them is a simple way to match your space. It gives your shelves a custom look.
Painting or Staining the Shelves
Painting your floating shelves adds color and personality. Pick a color that goes well with your room. Or, choose a bold color to stand out. Staining them gives a natural, rustic feel.
Before you start, clean and sand the shelves well. This ensures a smooth finish. Use a good primer or conditioner to help the paint or stain stick. Work slowly and evenly for the best look. Let each coat dry fully for a professional finish.
After the paint or stain dries, you can add more decorating floating shelves touches. Show off your favorite books, plants, or decorations. Try different ways to arrange them to match your style.
With these touches, your floating shelves become more than just storage. They become a stylish, personal highlight in your home.
Tips for Maximizing Space and Organization
Floating shelves are great for storing things, but you need to use them right to get the most out of them. With a few simple tips, you can turn your shelves into a neat and efficient storage system.
Start by grouping similar items together. Sort your stuff into categories and put each group on its own shelf. This keeps things tidy and makes it easier to find what you need.
To make the most of your shelves, use the vertical space. Instead of lining items up, stack them on the shelves. This lets you store more in a smaller area. Use bookends or dividers to keep things organized and prevent them from falling.
- Arrange items by how often you use them, with the most used at eye level.
- Use baskets, trays, or small containers to keep small items organized and clutter-free.
- Add lighting, like under-shelf LED strips, to make things easier to see and look good.
| Tip | Description |
|---|---|
| Group similar items | Categorize your belongings and assign specific shelves for different categories. |
| Utilize vertical space | Stack items neatly on the shelves to maximize storage capacity. |
| Arrange by frequency of use | Place the most commonly accessed items at eye level for easy access. |
| Use organizing containers | Incorporate baskets, trays, or small containers to keep small items tidy. |
| Add lighting | Use under-shelf LED strips to enhance visibility and create a visually appealing display. |
By using these tips for how to organize floating shelves and maximizing space with floating shelves, you can make your shelves a useful and beautiful part of your home.

Safety Considerations and Load Limits
When it comes to floating shelves, safety is key. Knowing the weight they can hold is crucial. Overloading can cause serious problems. It’s important to know the weight limits and how to mount them right.
First, check the weight capacity of your shelves. The makers usually tell you this. Remember, the weight limit includes what you’ll put on the shelf too. Too much weight can make the shelves unstable and unsafe.
Mounting the shelves correctly is also vital. Make sure the brackets are securely attached to the wall. Use the right screws and anchors for your wall type. Always attach the shelves to wall studs for the best stability. If studs are not available, use heavy-duty wall anchors to keep the shelves stable.
Don’t forget to check the shelves’ safety regularly. Look for any damage or wear on the brackets and hardware. Fix any problems you find right away to keep your shelves safe and sound.
Understanding the safety and weight limits of your shelves lets you enjoy their look and function safely. Proper planning and installation are key to a safe and lasting setup.
| Safety Consideration | Recommendation |
|---|---|
| Weight Capacity | Adhere to the manufacturer’s recommended weight limit for your floating shelves. |
| Mounting Technique | Securely attach the brackets to the wall, utilizing the appropriate screws and anchors for the wall material. Secure the shelves to wall studs whenever possible. |
| Regular Inspection | Regularly check the brackets and hardware for any signs of wear or damage, and address any issues promptly. |
By following these safety tips, you can enjoy your floating shelves safely. This ensures the safety of floating shelves and the weight capacity of floating shelves.
Maintenance and Care for Floating Shelves
Keeping your floating shelves looking great is important. A simple care routine can make them last for many years. Here’s how to keep your shelves in perfect condition.
Cleaning and Dusting
Keeping your shelves clean is crucial. Use a soft, dry microfiber cloth to dust them. This removes dirt and keeps them looking new. Don’t use harsh chemicals or rough cleaners, as they can harm the shelves.
Inspecting for Stability
Check your shelves often to make sure they’re securely attached. Look for loose brackets or screws. Tighten them if needed. This keeps your shelves safe and functional.
Addressing Minor Damage
Fix small scratches or chips right away. For wooden shelves, use wood filler or a touch-up marker. For other materials, follow the manufacturer’s advice for repairs.
| Maintenance Task | Frequency |
|---|---|
| Dusting and Cleaning | Weekly or bi-weekly |
| Inspecting Stability | Every 6 months |
| Addressing Minor Damage | As needed |
By following these easy care tips, your floating shelves will stay beautiful and useful for a long time. Remember, proper care is key to how to maintain floating shelves and ensure their longevity.
Conclusion
In this guide, we’ve covered how to make sturdy DIY garage floating shelves. These shelves help you use your space better. You now know how to plan, prepare, install, and customize your shelves.
Looking to tidy up your garage or show off your favorite items? This summary of floating shelves guide has got you covered. You’ll learn how to pick the right materials and install them correctly. This way, you can make your garage both stylish and practical.
Starting your DIY project? Always put safety first and think about how much weight your shelves can hold. Keeping your shelves in good shape will make them last longer. With some creativity, you can make your garage more organized and beautiful. Enjoy making your own custom storage solutions.