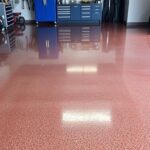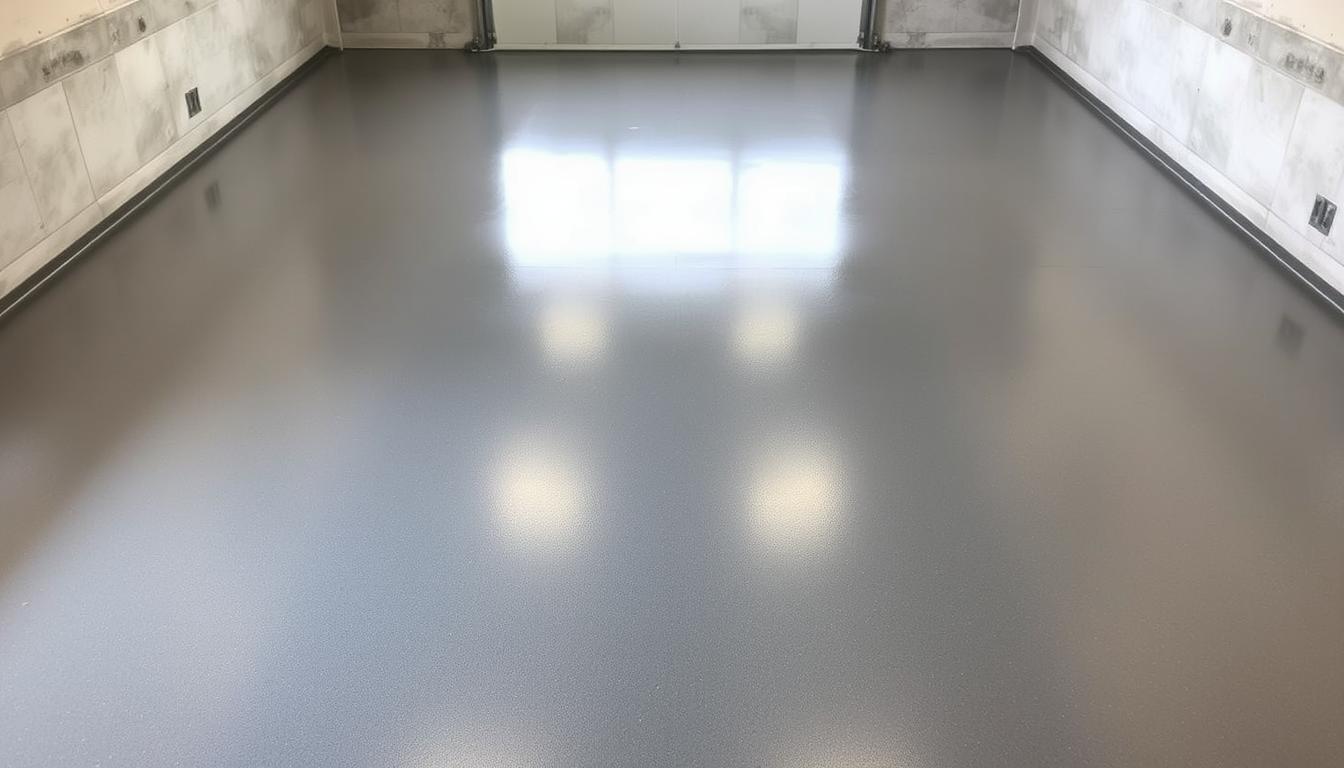
Polyurea garage floor coating has become a top choice for homeowners seeking a durable and attractive finish. Its quick drying time and resistance to wear make it ideal for high-traffic areas. However, achieving professional results requires the right product and proper techniques.
Using high-quality materials is essential for a long-lasting finish. The need for precision and attention to detail cannot be overstated. This article shares practical tips and lessons from real-world installations to help you master the process.
From essential tools to step-by-step guidance, you’ll learn everything required to transform your space. Following the correct steps ensures a smooth and durable result that stands the test of time.
Key Takeaways
- Polyurea coating is known for its durability and quick drying time.
- High-quality products are crucial for a professional finish.
- Proper preparation and techniques are essential for success.
- This guide provides step-by-step instructions for installation.
- Essential tools and materials are outlined for your convenience.
Understanding Garage Floor Coatings
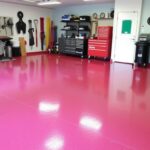
Protecting your concrete surface with the right material is essential for long-term durability. Coatings not only enhance the appearance but also shield the surface from wear, chemicals, and moisture. Whether it’s a residential or commercial space, choosing the right solution ensures longevity and performance.
There are several types of garage flooring options available, each with unique benefits. Epoxy is a popular choice for its affordability and versatility. Polyaspartic offers UV resistance and faster curing times. Polyurea stands out for its durability and quick application, making it ideal for high-traffic areas.
Proper curing and bonding are critical for a successful installation. Without these, the coating may peel or crack over time. Using the right roller ensures an even application, while a base coat provides a strong foundation for the top layer. These steps are vital for achieving a professional finish.
“The key to a durable finish lies in the preparation and application process. Skipping steps can lead to costly repairs down the line.”
Real-world installations highlight the importance of following manufacturer guidelines. For instance, applying the base coat in thin, even layers prevents bubbling and ensures proper adhesion. Similarly, using a high-quality roller minimizes streaks and uneven textures.
| Material | Key Feature | Best Use |
|---|---|---|
| Epoxy | Affordable, versatile | Residential spaces |
| Polyaspartic | UV resistant, fast curing | Outdoor areas |
| Polyurea | Durable, quick application | High-traffic zones |
In summary, understanding the differences between materials and their application techniques is crucial. Proper preparation, the right tools, and adherence to guidelines ensure a flawless finish that lasts for years.
The Shift from Epoxy to Polyurea Systems
The evolution of protective materials has led to a preference for polyurea. Historically, epoxy was the go-to option for many projects. However, its limitations, such as slower curing times and brittleness, have prompted a shift toward more advanced systems.
Polyurea and polyaspartic hybrids offer significant advantages. These materials provide better bonding, flexibility, and faster cure times. Unlike epoxy, they are also more resistant to UV rays, making them ideal for areas exposed to sunlight.
Technical factors like part mixing and proper ratios play a crucial role in achieving optimal results. Polyurea systems have evolved based on recommendations from experienced professionals. This ensures a smoother application process and a more durable finish.
Choosing the right option for your project is essential. Polyurea coatings are particularly well-suited for high-traffic areas due to their durability and quick application. Below is a comparison of epoxy and polyurea systems:
| Feature | Epoxy | Polyurea |
|---|---|---|
| Curing Time | Slow | Fast |
| Flexibility | Brittle | Flexible |
| UV Resistance | Low | High |
| Bonding Strength | Moderate | Strong |
In summary, the shift from epoxy to polyurea reflects advancements in material science. These systems offer superior performance, making them the preferred choice for modern applications.
Key Benefits of polyurea garage floor coating
Polyurea systems are gaining popularity for their unmatched durability and efficiency. These products offer a range of advantages that make them a top choice for protective applications. From quick curing to long-term performance, the benefits are hard to ignore.
One of the standout features is its rapid curing time. Unlike traditional materials, polyurea dries in hours, not days. This saves valuable time during installation, making it ideal for busy homeowners and professionals. Additionally, its flexibility ensures it won’t crack under pressure, even in high-traffic areas.
The durability of polyurea is another major benefit. It resists wear, chemicals, and UV rays, ensuring a long-lasting finish. This translates to fewer maintenance issues over the years, saving both time and money. According to user experiences, the product’s cost-effectiveness makes it a smart investment.
When compared to epoxy, polyurea shines under the 80/20 rule. It delivers 80% of the benefits with only 20% of the effort. For DIYers, this means achieving professional results without the hassle. The table below highlights the key differences:
| Feature | Epoxy | Polyurea |
|---|---|---|
| Curing Time | 24-72 hours | 2-4 hours |
| Durability | Moderate | High |
| Flexibility | Brittle | Flexible |
| Maintenance | High | Low |
In summary, polyurea’s benefits make it a superior choice for protective applications. Its quick curing, durability, and low maintenance needs ensure a high-performing finish that stands the test of time.
Comparing Polyurea, Epoxy, and Polyaspartic Options
Choosing the right protective material for your space can make a significant difference in durability and appearance. Three popular options—epoxy, polyurea, and polyaspartic—offer unique benefits. Understanding their differences helps you make an informed decision.
Epoxy is widely used for its affordability and versatility. It’s a great option for residential spaces but has slower curing times and can become brittle over time. Polyaspartic, on the other hand, offers UV resistance and faster curing, making it ideal for outdoor areas.
Polyurea stands out for its durability and quick application. It’s perfect for high-traffic zones due to its flexibility and resistance to wear. Professionals often recommend it for its long-lasting finish and ease of use.
Technical details also play a role in choosing the right material. Mixing ratios and pot life vary between systems. For example, polyurea has a shorter pot life but cures faster, while epoxy requires more time for curing and preparation.
“Polyurea’s quick curing and durability make it a top choice for busy homeowners and professionals alike.”
Real-life examples highlight the advantages of polyurea. Many DIYers and professionals prefer it for its cost-effectiveness and minimal maintenance needs. Below is a detailed comparison of these materials:
| Feature | Epoxy | Polyaspartic | Polyurea |
|---|---|---|---|
| Curing Time | 4-6 hours | 2-4 hours | |
| Durability | Moderate | High | Very High |
| Flexibility | Brittle | Flexible | Very Flexible |
| Cost per Gallon | $50-$70 | $80-$100 | $90-$120 |
In summary, each material has its strengths. Epoxy is budget-friendly, polyaspartic is UV-resistant, and polyurea offers unmatched durability and speed. Consider your specific needs to choose the best option for your project.
Proper Concrete Preparation for Success
Proper preparation of the concrete surface is the cornerstone of any successful protective application. Without a well-prepared base, even the best materials can fail. This process ensures optimal bonding and long-lasting results.
The first step is thorough cleaning. Remove dirt, oil, and debris from the surface. Any contaminants left behind can weaken the bond. Grinding the concrete is also essential. It creates a rough texture, improving adhesion and ensuring a smooth finish.
Moisture is another critical factor. Excess moisture can ruin the application. Use a moisture test to ensure the surface is dry. If moisture is present, address it before proceeding. This step is vital for preventing future issues like peeling or bubbling.
Following the mixed right ratio is equally important. Incorrect ratios can lead to poor curing and weak bonding. Always measure carefully and mix thoroughly. This ensures the material performs as expected, delivering a durable finish.
“Proper preparation is not just a step—it’s the foundation of a successful project. Skipping it can lead to costly repairs later.”
Real-world examples highlight the importance of preparation. In one case, a homeowner skipped grinding and cleaning. The result was poor adhesion and peeling within months. Another project followed all steps meticulously, resulting in a flawless finish that lasted years.
- Clean the surface thoroughly to remove contaminants.
- Grind the concrete to improve adhesion.
- Test for moisture and address any issues.
- Follow the mixed right ratio for optimal results.
In summary, taking the time to prepare the concrete surface correctly is non-negotiable. It ensures a strong bond, a smooth finish, and long-term durability. Respect the process, and the results will speak for themselves.
Ordering and Sizing Your Flooring Materials
Accurately estimating the amount of material needed is the first step to a successful project. Ordering the right lot ensures you have enough to complete the job without unnecessary waste. This process saves both time and money.
Start by measuring the square footage of your space. Most products come in multi-gallon buckets, so calculate the total area to determine how many buckets you’ll need. It’s wise to order slightly more than the exact amount to account for errors or unexpected needs.
Applying the base coat evenly is crucial for a smooth finish. Uneven layers can lead to weak spots or peeling. Follow the manufacturer’s guidelines for mixing ratios to ensure proper curing and bonding.
DIYers often share valuable lessons about measuring and mixing. One common tip is to label containers to avoid confusion. Another is to mix smaller batches to manage pot life effectively. These small steps can make a big difference in the final result.
“Ordering extra material is always better than running out mid-project. It’s a small investment that prevents delays and ensures quality.”
Here’s a quick guide to help you estimate the amount of material needed based on square footage:
| Square Footage | Gallons Needed |
|---|---|
| 200-400 sq ft | 1-2 gallons |
| 400-600 sq ft | 2-3 gallons |
| 600-800 sq ft | 3-4 gallons |
In summary, proper planning and ordering can save you a lot of time and effort. Measure carefully, order extra, and follow best practices for mixing and application. These steps ensure a professional finish that lasts for years.
Essential Tools and Equipment for Application
Having the right tools is essential for achieving a professional finish. The quality of your equipment directly impacts the efficiency and durability of the application. From mixing to spreading, each step requires specific tools to ensure a smooth process.
Recommended Mixing & Application Tools
High-quality tools are the backbone of any successful project. A sturdy roller is crucial for even distribution, while a notched squeegee helps spread the material smoothly. Mixing buckets with measurement markings ensure accurate ratios, preventing issues like improper curing.
Prepping your roller is equally important. De-linting it with packing tape removes loose fibers that could mar the finish. This small step ensures a clean and professional look. Always choose tools designed for the specific product you’re using to avoid compatibility issues.
Personal Safety Equipment and Precautions
Safety should never be overlooked. Wear gloves to protect your hand from chemicals and abrasions. A respirator is essential when working in enclosed spaces to avoid inhaling fumes. Proper ventilation ensures clean air and reduces health risks.
Following safety recommendations not only protects you but also ensures a smoother workflow. For example, wearing non-slip shoes prevents accidents on wet surfaces. These precautions are simple yet vital for a successful project.
“Investing in the right tools and safety gear is the foundation of a flawless finish. It’s a small cost that pays off in the long run.”
In summary, using the correct tools and safety equipment is non-negotiable. Proper preparation and attention to detail ensure a professional result that lasts for years.
Step-by-Step Application Process
Achieving a flawless finish requires careful attention to each step of the application process. From preparing the surface to applying the final layer, precision is key. This guide breaks down the essential steps to ensure a professional result.
Applying the Moisture Barrier and Crack Filler
The first step is to apply a moisture barrier. This prevents water from seeping through and damaging the coat. Use a high-quality product and spread it evenly across the surface. Allow it to dry completely before moving to the next step.
Next, fill any cracks or imperfections. A crack filler ensures a smooth base for the top coat. Apply it carefully, following the manufacturer’s instructions. This step is crucial for a seamless finish.
Techniques for Base and Top Coat Application
Mixing the parts correctly is essential. Follow the recommended ratio to ensure proper curing. Monitor the pot life closely, as working within this timeframe is critical for a successful application.
For the base coat, use a high-quality roller to spread the material evenly. Work in small sections to maintain consistency. Once the base layer is dry, apply the top coat using the same technique. This final layer adds durability and enhances the appearance.
“Timing and technique are everything. Rushing or skipping steps can compromise the entire process.”
Here are some practical reminders to keep in mind:
- Always clean tools immediately after use to prevent hardening.
- Work in a well-ventilated area to ensure safety and proper curing.
- Double-check measurements to avoid mixing errors.
By following these steps, you can achieve a professional finish that lasts for years. Attention to detail and adherence to guidelines are the keys to success.
Managing Pot Life and Cure Times
Understanding pot life and cure times is essential for a smooth and durable finish. These factors determine how long you have to work with the material and when it’s safe to apply the next layer. Ignoring them can lead to poor adhesion or premature drying.
Pot life refers to the amount of time the material remains workable after mixing. Once this time expires, the product begins to harden, making application difficult. Monitoring pot life ensures you apply the material evenly before it sets.

Cure times are equally important. This is the time it takes for the material to fully harden and bond to the surface. Applying a new layer too soon can cause peeling or bubbling. Always check the manufacturer’s guidelines for recommended cure times.
One simple way to test if a layer is ready is the “thumb test.” Press your thumb gently on the surface. If it leaves no mark, the layer is cured and ready for the next step. This method is quick and effective for DIYers.
“Managing pot life and cure times is like following a recipe. Skipping steps or rushing can ruin the entire project.”
Ambient temperature and humidity also play a role. In colder conditions, cure times may extend, while warmer temperatures can shorten them. Plan your work schedule accordingly to avoid issues. For example, working in the morning or evening can help manage drying conditions.
If you encounter timing issues, don’t panic. Troubleshooting starts with understanding the material’s behavior. For instance, if the product hardens too quickly, mix smaller batches to extend pot life. If curing takes longer, ensure the area is well-ventilated and at the right temperature.
Here are some practical tips to keep in mind:
- Always measure and mix materials accurately to maintain pot life.
- Use the “thumb test” to check if a layer is fully cured.
- Adjust your schedule based on temperature and humidity levels.
- Mix smaller batches to manage pot life effectively.
By mastering pot life and cure times, you ensure a professional finish that lasts for years. Attention to these details makes all the difference in achieving a durable result.
Troubleshooting Common Application Problems
Even with careful planning, challenges can arise during the application process. Identifying and addressing these issues early ensures a smooth and durable finish. This section covers common problems and provides practical solutions to help you achieve professional results.
Preventing Bubbles and Adhesion Issues
Bubbling and poor adhesion are frequent problems that can compromise the finish. To prevent these issues, ensure the surface is clean and dry before application. Any contaminants or moisture can weaken the bond, leading to bubbling or peeling.
Proper mixing is also crucial. Follow the manufacturer’s instructions for part ratios to avoid curing issues. Use a high-quality roller to apply the material evenly, reducing the risk of air pockets. If bubbles appear, use a roller or squeegee to smooth them out immediately.
“Prevention is always better than correction. Taking the time to prepare and apply correctly saves effort in the long run.”
Correcting Mistakes and Recoating Strategies
Mistakes can happen, but they don’t have to ruin your project. If you notice uneven areas or peeling, sand the affected spot lightly to create a smooth surface. Clean the area thoroughly before applying a new coat.
Recoating requires careful timing. Wait until the previous layer is fully cured before adding another. This ensures proper adhesion and prevents further issues. Use blue tape to mark areas that need touch-ups, ensuring precision and a clean finish.
Here are some actionable steps to avoid recurring problems:
- Always follow mixing instructions to maintain the correct part ratios.
- Work in small sections to ensure even application.
- Use high-quality tools to minimize streaks and air pockets.
- Monitor curing times closely to avoid premature recoating.
By addressing problems promptly and following best practices, you can achieve a flawless finish that lasts for years. Attention to detail and adherence to guidelines are the keys to success.
Weather Considerations for Optimal Application
Weather plays a crucial role in ensuring a successful application process. Ambient temperature and humidity directly impact curing times and the overall quality of the finish. Ignoring these factors can lead to uneven thickness, poor adhesion, or premature drying.
High temperatures can shorten the hour-long pot life, making it difficult to apply the material evenly. Conversely, cold weather can extend curing times, delaying the next steps. Humidity also affects the process, as excess moisture can weaken the bond and cause bubbling.
To avoid these issues, schedule your work during cooler parts of the day, such as early morning or late evening. Check the weather forecast to ensure stable conditions. Proper ventilation is also essential, as good air movement helps the material cure evenly.
“Timing your project with the right weather conditions is half the battle. It ensures a smooth application and a durable finish.”
Real-world examples highlight the importance of weather planning. In one case, a project was delayed due to unexpected rain, resulting in uneven thickness and peeling. Another project, completed during a stable weather window, achieved a flawless finish that lasted for years.
Here’s a quick guide to weather conditions and their impact:
| Condition | Impact | Solution |
|---|---|---|
| High Temperature | Shortens pot life | Work in cooler hours |
| Low Temperature | Extends curing time | Use heaters or wait |
| High Humidity | Weakens bond | Ensure proper ventilation |
By understanding and planning for weather conditions, you can achieve a professional finish. Proper timing, ventilation, and attention to detail ensure a durable result that stands the test of time.
Comparing DIY and Professional Approaches
Deciding between a DIY project and hiring professionals can significantly impact the outcome of your garage upgrade. Both approaches have their merits, but understanding the differences helps you make an informed choice. Whether you’re tackling a home improvement or an industrial project, weighing the pros and cons is essential.
DIY projects offer flexibility and cost savings. Many homeowners enjoy the satisfaction of completing the work themselves. However, this option requires time, effort, and attention to detail. Mistakes can lead to costly repairs, especially if the material isn’t applied correctly.

Professional contractors bring expertise and specialized equipment. Their industrial methods ensure a flawless finish, even in challenging conditions. While this option may cost more, it saves time and guarantees long-lasting results. For complex projects, hiring professionals is often the better choice.
“Choosing the right approach depends on your skill level, budget, and project scope. Both DIY and professional methods have their place in home improvement.”
Cost-benefit comparisons reveal interesting insights. DIY projects are cheaper upfront but may require maintenance sooner. Professional work has a higher initial cost but offers durability and peace of mind. Consider your long-term goals when deciding which option is best for your garage.
Real-world examples highlight the importance of this decision. One homeowner attempted a DIY project but struggled with uneven application. Another hired professionals and achieved a flawless finish that lasted for years. These experiences underscore the value of choosing the right approach.
Here are some factors to consider when deciding between DIY and professional work:
- Skill level and experience with similar projects.
- Time availability and project complexity.
- Budget constraints and long-term maintenance needs.
- Access to specialized tools and equipment.
In summary, both DIY and professional approaches have their advantages. Evaluate your specific needs and resources to determine the best option for your garage project. A well-informed decision ensures a successful outcome that meets your expectations.
Understanding the Role of Primers and Base Coats
Primers and base coats are the unsung heroes of any durable surface finish. They ensure proper adhesion and create a uniform foundation for the final layer. Without them, even the best materials can fail to bond effectively, leading to peeling or cracking over time.
Using a primer is essential, even with advanced systems like polyurea. It prepares the surface by filling pores and creating a strong bond. The base coat adds an extra layer of protection, ensuring a smooth and even finish. Together, they form the backbone of a long-lasting application.
Mixing the parts correctly is critical. Follow the manufacturer’s instructions to achieve the right ratio. Incorrect mixing can lead to poor curing and weak adhesion. Use a high-quality product to ensure optimal results. Real-life examples show that precision in this stage directly impacts the final outcome.
“A strong finish starts with the right primer and base coat application. Skipping these steps can compromise the entire project.”
Standard epoxy primers are widely used, but specialized polyurea primers offer additional benefits. They provide better flexibility and faster curing times. Choose the product that best suits your needs. Always test the surface to ensure compatibility before proceeding.
Here’s a step-by-step guide to applying primers and base coats:
- Clean the surface thoroughly to remove dirt and debris.
- Apply the primer evenly using a roller or brush.
- Allow it to dry completely before adding the base coat.
- Mix the parts carefully to maintain the correct ratio.
- Apply the base coat in thin, even layers for optimal results.
By following these steps, you ensure a durable and professional finish. Precision in the preparation and application process is key to long-term success.
Maintenance and Longevity of Polyurea Coatings
Maintaining the longevity of a durable surface finish requires consistent care and attention. Proper installation sets the foundation, but routine maintenance ensures the product remains in top condition for years. Simple practices can keep the surface looking fresh and performing well.
Proper curing is critical for long-term durability. The cure process ensures the material bonds effectively, preventing peeling or cracking. A high-quality top coat adds an extra layer of protection, enhancing resistance to wear and tear.
Over time, minor issues like scratches or dullness may appear. These can be resolved with periodic touch-ups. Using additives like silver glitter not only enhances aesthetics but also helps track application areas for even coverage.
“Routine maintenance is the key to preserving the finish. A little effort goes a long way in extending its lifespan.”
Here are some essential maintenance practices:
- Clean the surface regularly to remove dirt and debris.
- Use mild cleaners to avoid damaging the coat.
- Inspect for cracks or wear and address them promptly.
- Reapply a top coat every few years for added protection.
Professional evaluations are recommended every few years. Experts can identify potential issues early and suggest minimal recoats if needed. This proactive approach ensures the finish remains durable and attractive for decades.
By following these guidelines, you can maximize the lifespan of your surface finish. Proper care and attention ensure it continues to perform well, year after year.
Lessons Learned from Real-World Installations
Real-world installations offer invaluable insights into the dos and don’ts of surface finishing. Contractors and DIYers alike have shared their experiences, highlighting common mistakes and effective solutions. These lessons can help you achieve a flawless result in your own projects.
One frequent issue is tool failure. Using low-quality rollers or mixers can lead to uneven application. A member joined an online forum shared how upgrading their tools improved the finish significantly. This feedback emphasizes the importance of investing in reliable equipment.

Improper mixing is another common pitfall. One contractor recounted how incorrect ratios caused the material to cure too quickly. This led to a patchy finish that required rework. Following manufacturer guidelines and measuring carefully can prevent such issues.
Weather misjudgments also pose challenges. A DIYer shared how unexpected humidity caused bubbling in their project. Checking forecasts and scheduling work during stable conditions can mitigate this risk. Proper ventilation is equally crucial for a smooth finish.
“Learning from others’ mistakes saves time and resources. Online communities like messages location provide a wealth of knowledge for beginners and pros alike.”
Alliances among professionals have also driven improvements. An alliance member joined forces with peers to troubleshoot a complex issue. Their collaborative approach led to innovative solutions that benefited the entire community. Such partnerships highlight the value of shared expertise.
Here’s a summary of common mistakes and their solutions:
| Mistake | Solution |
|---|---|
| Tool failure | Invest in high-quality equipment |
| Improper mixing | Follow manufacturer guidelines |
| Weather misjudgment | Check forecasts and ensure ventilation |
| Incorrect ratios | Measure carefully and mix thoroughly |
By applying these lessons, you can avoid common pitfalls and achieve a professional finish. Real-world experiences, shared through forums and alliances, provide actionable insights for success.
Conclusion
Achieving a professional finish in your space requires attention to detail and the right approach. This guide has walked you through essential steps, from preparation to application and troubleshooting. Proper tools, timing, and technique are key to success.
When done correctly, polyurea offers a durable and long-lasting solution for high-traffic areas. It’s a viable choice for enhancing your garage or home space. Remember, the quality of your roller and adherence to guidelines make all the difference.
Before starting, review lessons from real-world installations to avoid common pitfalls. Follow the detailed steps outlined here to ensure a flawless result. With the right effort, you can transform your space into a durable and attractive area that lasts for years.