Turning your garage into a more organized space is a big win. Installing garage ceiling storage is a smart way to use the vertical space. This guide will show you how to do it, making your garage more efficient and tidy.
Garage ceiling storage is a great way to save space. It lets you store things like seasonal items and big equipment. This keeps your garage floor clear and easy to get to. We’ll talk about the benefits, what you need, how to measure, and how to install it right.
Key Takeaways
- Maximize your garage’s vertical space with ceiling storage solutions
- Assess your storage needs and available space to plan the project
- Utilize the right tools and materials for a secure and efficient installation
- Measure and mark the ceiling with precision to ensure a seamless setup
- Incorporate adjustable shelving systems for versatile storage options
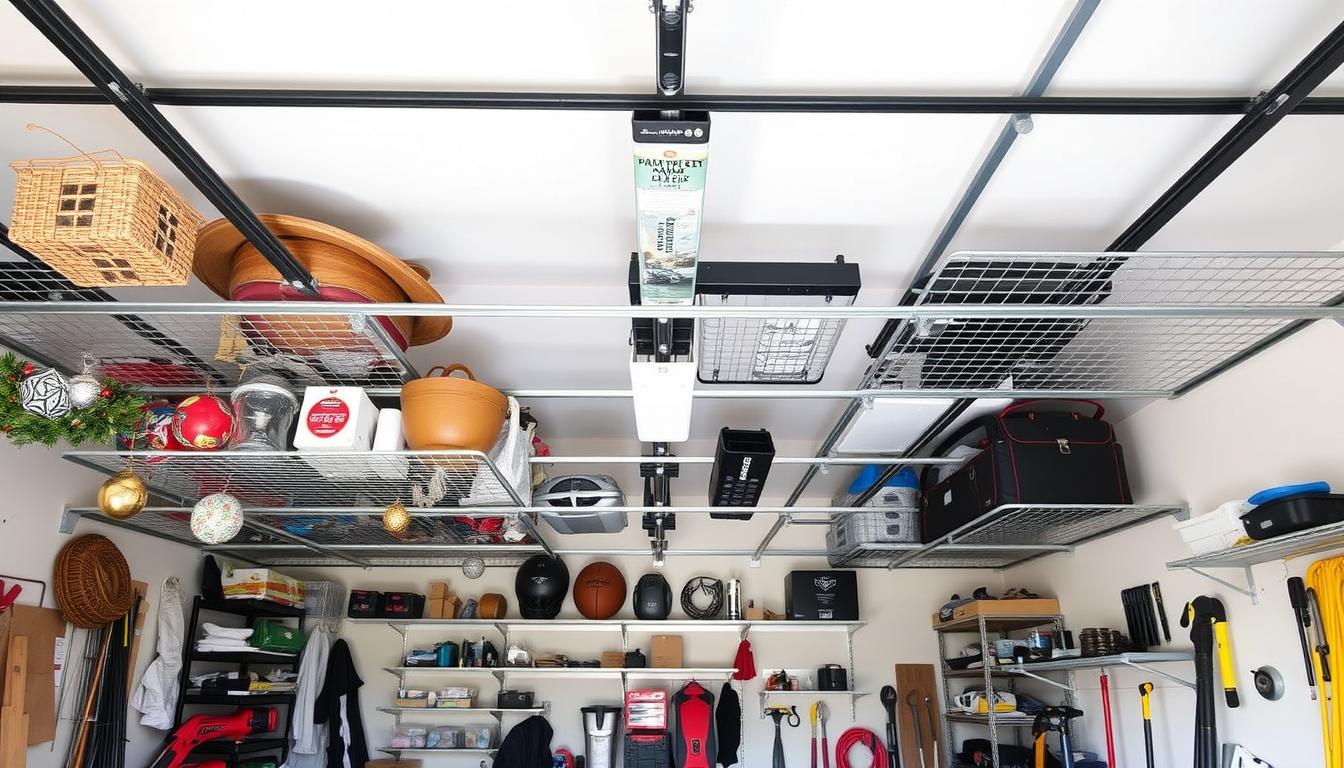
Unleash the Power of Vertical Space in Your Garage
Is your garage feeling cramped and cluttered? Look up – your garage ceiling might hold the key. Garage ceiling storage can change the game by maximizing space and keeping things tidy.
Why Garage Ceiling Storage is a Game-Changer
Using your garage’s vertical space frees up floor room. This makes your storage more efficient and organized. It helps declutter and makes the most of your garage’s space.
Benefits of Installing Overhead Storage Solutions
- Increased storage capacity: Overhead units add extra space for your stuff, clearing floor and wall areas.
- Improved organization: Storing items above makes your garage look better and more organized.
- Efficient use of space: Use your garage’s height to its fullest, making the most of every inch.
- Enhanced accessibility: Good overhead storage lets you easily get to what you need.
Need to store seasonal items, tools, or big equipment? A smart garage ceiling storage plan can make a big difference. Check out the options and make the most of your garage’s vertical space.
“Utilizing the vertical space in your garage is a simple yet highly effective way to transform your storage situation and regain control of your space.”
Planning Your Garage Ceiling Storage Project
Turning your garage into a tidy space begins with planning. When setting up garage ceiling storage, it’s key to know what you need and how much space you have. By carefully looking at your storage needs and garage size, you can pick the perfect overhead solution.
Assessing Your Storage Needs and Available Space
First, list the items you’ll store in your garage. Think about each item’s size, weight, and how often you’ll use it. This helps figure out the right storage size and type. Then, measure your garage, focusing on the ceiling height and the garage ceiling joists‘ strength. This info helps choose the best garage ceiling fans and storage that fit safely and use your space well.
- Evaluate your storage needs: make a list of items to be stored
- Measure your garage dimensions: ceiling height, joist capacity
- Determine the appropriate storage units based on your requirements
Planning your garage ceiling storage project well ensures your new system meets your needs. It also makes your garage more organized and functional. Next, we’ll look at the tools and materials you’ll need for the job.
Essential Tools and Materials for the Job
Starting your garage ceiling storage project means getting the right tools and materials. This list will help you have everything needed for a smooth installation.
You’ll first need a power drill to make holes for your storage units. A stud finder is key to find the strong wooden beams in your garage ceiling. These are where you’ll mount your storage system securely.
- Power drill
- Stud finder
- Screwdriver set
- Measuring tape
- Level
- Ladder or step stool
- Protective eyewear and gloves
You’ll also need the right fasteners to attach your storage units. The type of fastener depends on your garage ceiling material. Lag bolts, toggle bolts, or anchors might be needed. Always check with the manufacturer or a hardware expert to pick the best fasteners for your job.
| Tool or Material | Purpose |
|---|---|
| Power Drill | Drilling holes for mounting hardware |
| Stud Finder | Locating sturdy wooden beams in the ceiling |
| Screwdriver Set | Securing storage units and fasteners |
| Measuring Tape | Accurately measuring the installation area |
| Level | Ensuring your storage units are properly aligned |
| Ladder or Step Stool | Accessing the garage ceiling safely |
| Protective Eyewear and Gloves | Ensuring a safe and comfortable installation |
With these tools and materials, you’re ready to start your garage ceiling storage project. Always keep safety first and follow all instructions for a successful installation.
Measuring and Marking: Precision is Key
Getting precise measurements and placing things right is key for a great garage ceiling storage setup. By carefully checking your space and finding the ceiling joists, you can make sure your setup is both safe and looks good. This way, you’ll make the most of your garage’s space.
Determining the Optimal Placement for Your Storage Units
First, use a stud finder to find the ceiling joists in your garage. These strong beams will hold up your overhead storage units well. After finding the joists, use a tape measure to mark where you want your storage shelves or racks.
- Measure your garage ceiling’s height to figure out how high your storage units can go.
- Mark where you want your storage units, making sure they’re between the ceiling joists.
- Measure the space between the joists to make sure your units will be securely attached.
By planning the spot for your garage ceiling storage carefully, you can make a space that looks good and works well. It will meet your storage needs perfectly.
“Proper planning and precise measurements are the keys to a successful garage ceiling storage installation. Take the time to get it right, and you’ll be rewarded with a functional and clutter-free space for years to come.”
Remember, paying close attention to detail is very important when measuring and marking for your garage ceiling storage. With a careful and methodical approach, you can make sure your installation goes smoothly and efficiently.
How to Install Garage Ceiling Storage
Turning your garage into a tidy storage area is a big win. Installing garage ceiling storage is a smart way to use more space. Here’s how to do it right, so your stuff stays safe and organized.
Step-by-Step Instructions for a Seamless Installation
Setting up garage ceiling storage is easy with the right tools and materials. Here’s what you need to do for a smooth installation:
- Check the Ceiling: Look over your garage ceiling to find the best spot for your storage. Find strong beams or joists that can hold the weight of your items.
- Mark the Mounting Points: Use a stud finder to find the joists and mark where to put the brackets.
- Secure the Brackets: Drill holes and screw the brackets to the ceiling with strong screws or lag bolts.
- Build the Storage Units: Follow the maker’s guide to put together your garage ceiling storage units. Make sure everything fits right and is tight.
- Attach the Units: Lift the units with a friend and place them on the brackets. Follow the maker’s instructions to secure them.
- Level and Adjust: Use a level to make sure the units are straight. Adjust as needed for a neat look.
- Fill and Organize: Now, put your stuff in the garage ceiling storage. Use the vertical space to clear out your garage and keep things tidy.
By following these steps, you can make your garage a neat and useful storage area. You’ll use more space and keep your things easy to find.
Securing Your Overhead Storage Units
Keeping your garage ceiling storage safe and stable is key. You need to secure the units well to the garage ceiling joists. This way, your items stay safe, even when there are sudden movements or shakes.
Fastening to the Ceiling Joists
For a stable overhead storage system, anchor the units to the ceiling joists. This gives a strong base that can handle the weight of your items. When putting in the storage units, find the joists and use strong fasteners like lag bolts or screws to attach the brackets.
- Find the ceiling joists with a stud finder or by tapping on the ceiling.
- Drill pilot holes first to avoid splitting the wood when you put in the fasteners.
- Make sure the fasteners are long enough to go deep into the joists for a solid hold.
Distributing the Weight Evenly
When you have more than one storage unit, spread the weight evenly. This avoids putting too much stress on one joist and keeps the system stable. Think about the weight of your units and plan where to put them.

By following these steps, you can have a safe and reliable storage space in your garage.
Optimizing Space with Adjustable Shelving Systems
Keeping your garage ceiling storage organized is key. Adjustable shelving systems are a smart choice. They offer many benefits that change how you use your overhead space.
Versatile Solutions for Ever-Changing Storage Needs
Adjustable shelving systems for garage ceiling storage grow with you. You can change the layout and shelf heights. This makes your overhead space always useful, no matter what you need to store.
Need to store seasonal items, big equipment, or more tools? Adjustable shelving is the answer. It lets you use your garage’s vertical space better, saving floor room for other things.
| Feature | Benefit |
|---|---|
| Customizable shelf heights | Accommodate items of various sizes and shapes |
| Modular design | Easily expand or reconfigure the storage system as needed |
| Durable construction | Supports heavy-duty storage without compromising stability |
| Easy installation | Streamlined setup process for a seamless DIY project |
Investing in adjustable shelving for your garage ceiling storage boosts organization and efficiency. Choose versatile storage to make your garage work better for you.
Incorporating Lighting into Your Ceiling Storage Design
Adding the right lighting to your garage ceiling storage is key. It boosts both looks and function. The right lights make your storage easier to use and look at.
Recessed cans are a top pick for garage lighting. They look clean and light up the area well. Suspended track lighting is also great, letting you place lights where you need them most.
Choosing the right lighting means installing it right. Make sure lights match your storage and fit your ceiling. This way, every corner gets enough light.
Choosing the Right Garage Ceiling Fans with Lights
Think about using garage ceiling fans with light and remote for your storage. They light up the space and keep it cool. This makes your garage a better place to work.
When picking garage ceiling fans lowes, look for ones you can dim and control with a remote. These fans do more than just light up your garage. They make it a better place to be.
“Lighting is a key element in any well-designed storage space, as it can dramatically impact the usability and aesthetic appeal of the area.”
Adding lights to your garage ceiling storage makes it better. It turns a simple space into a useful and nice area. With the right lights and setup, your garage will be more efficient and comfortable.

Safety Considerations for Garage Ceiling Storage
When you’re setting up how to install garage ceiling storage, safety comes first. It’s key to make sure your installation is safe for your stuff and family. By following these tips, you can make a storage system that works well and is safe.
Assessing Load Capacity
Before you start, check how much weight your ceiling can handle. Putting too much weight on the storage can cause serious problems. If you’re not sure, get help from a pro to find out the ceiling’s weight limits.
Proper Installation Techniques
- Use strong, rated hardware and fasteners to hang the storage units.
- Stick to the manufacturer’s guide for a stable and even installation.
- Think about the ceiling fan in garage code rules, as they might affect where you put your storage.
Maintaining Balance and Weight Distribution
Spread the weight of your items evenly across the storage units. Don’t put too much weight in one spot. This can put too much stress on the ceiling and might make it fail.
“Safety should never be compromised when it comes to overhead storage solutions. By taking the necessary precautions, you can enjoy the benefits of increased storage space without compromising the integrity of your garage.”
A well-thought-out and safe how to install garage ceiling storage system protects your things and keeps your garage safe. By following these steps, you can make a secure storage solution that meets your needs for a long time.
Creative Ideas for Maximizing Your Overhead Space
Get creative and turn your garage’s overhead space into a useful and attractive storage area. You can build custom storage units or use unique organizational systems. Find out how to use your vertical space well and create a storage system that fits your needs.
Picture a modern overhead storage system that matches your garage’s look. Use adjustable shelves and tiers to fit your changing storage needs. Choose strong, powder-coated steel racks for heavy items, saving floor space.
Consider building a custom storage loft with built-in cabinets and drawers. This idea not only uses your overhead space but also looks good and keeps things organized. Add task lighting to make it easy to find and manage your stuff.