In this guide, we’ll show you how to build a strong and useful garage tool bench. It’s great for creating a dedicated space, organizing tools, or turning your garage into a workshop. We’ll talk about important design choices, tools, and materials you’ll need. Plus, we’ll share tips to make sure your bench fits all your needs.
Key Takeaways
- Discover the benefits of a DIY garage tool bench for your workspace
- Learn the essential tools and materials needed to build a sturdy bench
- Explore design considerations to ensure your garage bench meets your specific needs
- Receive step-by-step guidance on cutting, assembling, and finishing your custom bench
- Discover ways to maximize storage and organization on your new garage tool bench
Introduction to Building a Garage Tool Bench
A well-designed garage tool bench can change your workshop game. It gives you a solid surface for projects and keeps tools organized. Building a custom bench is a smart move that boosts your workspace’s function and efficiency.
Why a DIY Garage Bench is a Smart Investment
Making your own garage tool bench has many benefits. You can design it to fit your needs perfectly, ensuring it’s both useful and organized. Plus, doing it yourself can be a fun project that saves money. With the right tools and materials, you can make a durable and stylish workspace that beautifies your garage.
Essential Tools and Materials Needed
To start your garage tool bench project, you’ll need some key tools and materials. You’ll need power tools like a circular saw, drill, and impact driver. Also, basic hand tools such as a hammer, screwdrivers, and a measuring tape are necessary. For building, you’ll need strong wood like plywood, 2x4s, or 2x6s, wood glue, screws, and a surface material like MDF or butcher block.
| Tool | Material |
|---|---|
| Circular Saw | Plywood |
| Drill | 2x4s |
| Impact Driver | Wood Glue |
| Hammer | Screws |
| Screwdrivers | MDF or Butcher Block |
| Measuring Tape | – |
With the right tools and materials, you can begin designing and building your custom garage workshop bench. It will be the perfect space for all your garage tool hanging ideas and how to make a garage bench projects.
Designing the Perfect Garage Tool Bench
Creating the ultimate garage work bench starts with assessing your space and storage needs. This careful planning ensures your DIY bench fits your specific needs. It maximizes efficiency and functionality in your garage.
Assessing Your Workspace and Storage Needs
Begin by measuring your garage’s size and layout. Determine the best dimensions for your work bench. Think about the projects you’ll do and the tools you’ll need. Will you need extra storage for materials or tools?
Consider the activities you’ll do on the bench. Do you need a strong surface for woodworking or car repairs? The bench’s height, weight capacity, and sturdiness should match your needs. By evaluating your needs, you can how to build a garage table that boosts your productivity.
“The key to creating the perfect garage work bench is to start by carefully assessing your unique needs and available space. This thoughtful planning will ensure your DIY project is tailored to your specific requirements.”
After identifying your needs, design and build your dream work bench ideas garage. Choose the right materials for a sturdy, functional work surface. This will be the base for all your garage projects.
Step-by-Step Guide to Building a Sturdy Garage Bench
Building a garage tool bench is a fun DIY project. It can make your workspace better. We’ll show you how to cut and put together the frame. Plus, how to install the tabletop right.
Cutting and Assembling the Frame
The first step is the frame. Measure and cut the wood to the right size. Make sure the pieces fit well, then glue and screw them together. This makes a strong base for your bench.
Installing the Tabletop Surface
Now, add the tabletop. Choose something tough like plywood or a solid wood slab. Measure and cut it to fit your frame. Use glue and screws to attach it. You can also sand and stain or paint it for a nice look.
By following these steps, you’ll make a sturdy and useful garage tool bench. It will be the heart of your DIY area. Always be safe and take your time for the best results.
Maximizing Garage Bench Storage and Organization
A DIY garage bench offers a great chance to improve storage and organization. By adding smart storage, you can keep tools and supplies tidy and within reach. This turns your garage into a productive workspace.
To make the most of your garage bench storage, try these tips:
- Install drawers: Add pull-out drawers under your bench for small items and fasteners. This keeps your area clean and your tools handy.
- Utilize shelves: Put shelves above or next to your bench for bigger items and tools. Arrange them to fit your storage needs.
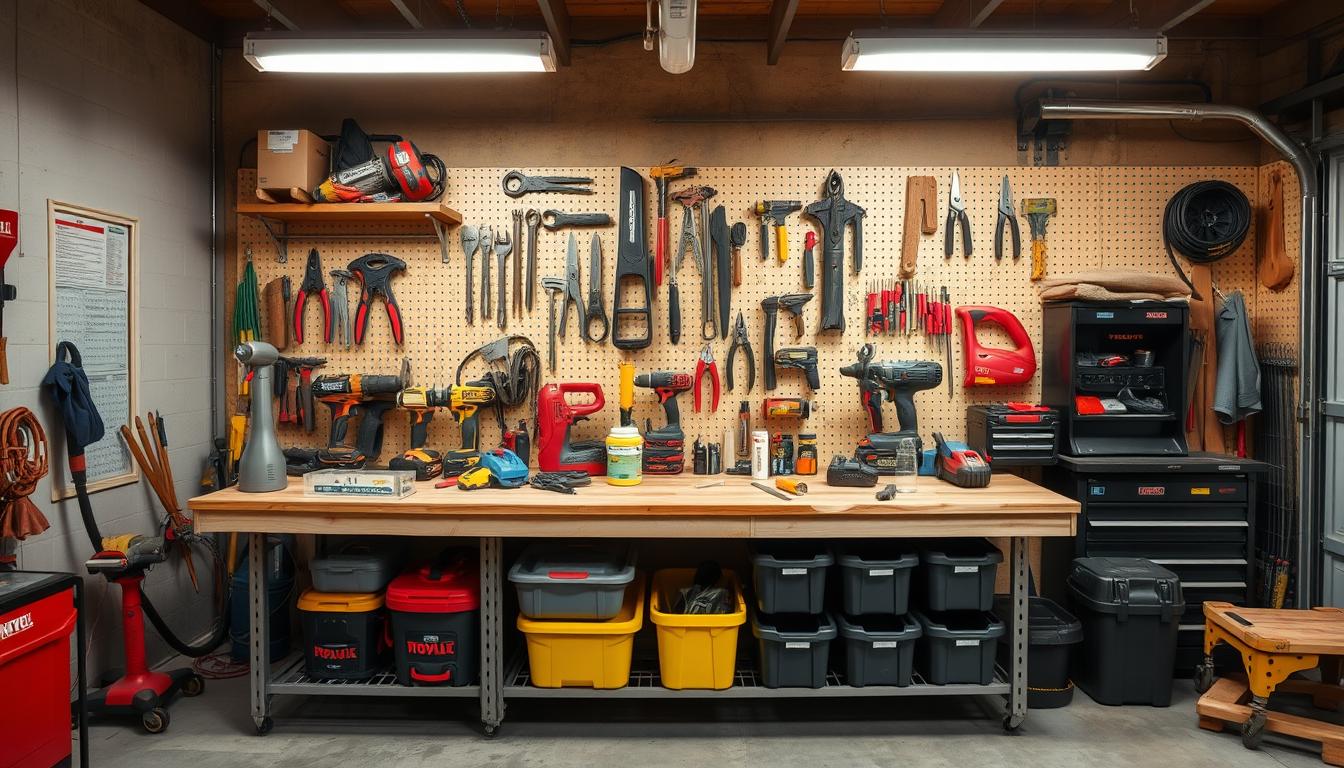
- Incorporate a pegboard: Hang a pegboard on the wall for a customizable tool-hanging system. It helps organize hand tools and accessories neatly.
Maximizing storage on your DIY garage bench makes your workspace look good and work better. A tidy garage means you can find what you need fast. This makes DIY projects and maintenance easier.
Take the time to choose and set up the right storage for your needs. A well-organized garage will benefit you for many years.
Garage Tool Bench Ideas for Added Functionality
Turning your garage tool bench into a productive space is key. Adding a pegboard or tool hanging system is a smart move. It makes your workspace more organized and efficient.
Incorporating a Pegboard or Tool Hanging System
A pegboard is a great addition to any garage workshop bench. It lets you store and display your most used tools neatly. This keeps them within reach, making your work area look good and clutter-free.
Another choice is a tool hanging system with hooks, racks, and organizers. It’s perfect for hanging bigger tools like power saws or impact wrenches. This keeps your workspace tidy and efficient.
When setting up your garage workshop bench, make sure to include space for a pegboard or tool hanging system. This way, your essential tools are always at hand. It streamlines your work and makes the most of your space.
To make your garage tool bench even better, consider adding custom features. Think about built-in storage drawers, a vise, or a power strip. These additions ensure your tools are always charged and ready. With some creativity and planning, your garage workshop bench can become a productive and organized center.
Finishing Touches and Personalization
After building your how to build a garage table or garage tool bench ideas, it’s time for the final touches. We’ll look at staining, painting, and customizing your bench. This will make it reflect your personal style and preferences.
Staining, Painting, and Customizing Your Bench
Adding the finishing touches can change your workspace. You can choose from many colors and accents. This makes your garage tool bench truly unique and appealing.
For a stained finish, try different wood tones. Light tones can make your space feel bright. Richer stains add elegance and sophistication.
If you want a bold look, paint your how to build a garage table. You can pick from neutrals or vibrant colors. The paint color sets the mood for your garage.
Be creative with your customization. Add unique touches like carved initials or laser-etched designs. You can even include a built-in whiteboard or chalkboard. This makes your garage tool bench ideas stand out.

“The key to a truly personalized workspace is to let your creativity shine through. Don’t be afraid to experiment and try new things – the possibilities are endless!”
Maintaining Your Garage Tool Bench
Having a garage tool bench is a big deal. But the real value is in keeping it in good shape over time. By following a few easy steps, your workspace will last for many years. This is true whether you’re organizing tools in your garage or selling a garage full of tools.
Routine Cleaning and Inspections
First, clean your garage tool bench regularly. Use a damp cloth to wipe away dust, debris, or spills. Check the frame and joints for wear or looseness. Tighten any loose bolts or screws.
This simple routine keeps your bench strong and looking good.
Protecting the Finish
If your bench has a stained or painted finish, apply a clear sealant or polyurethane every few years. This protects the surface from damage. It prevents fading, scratches, and water damage, keeping your bench looking new.
Addressing Wear and Tear
Even the toughest benches show signs of wear over time. If you see cracks, splits, or damage, fix them right away. You might need to reinforce the frame, replace the tabletop, or make other repairs. This keeps your bench safe and working well.
“Proper maintenance is the key to a long-lasting, reliable garage tool bench. By investing a little time and effort, you can keep your workspace in top condition for years to come.”
By following these tips, your garage tool bench will be a valuable asset for a long time. A well-maintained bench looks great and provides a safe, efficient workspace for all your DIY projects.
| Maintenance Task | Frequency | Benefits |
|---|---|---|
| Cleaning and Inspection | Monthly | Ensures structural integrity and appearance |
| Finish Protection | Every 2-3 Years | Prevents fading, scratches, and water damage |
| Addressing Wear and Tear | As Needed | Maintains safety and functionality |
Garage Tool Bench Ideas for Inspiration
Building a garage tool bench can be a fun DIY project. We’ve gathered some cool ideas from DIY fans and workshop pros. These ideas show how you can make your bench unique, with smart storage and power tool spots.
Using a pegboard system is a great idea. It keeps tools organized and adds an industrial look. Adjustable shelves or pull-out drawers also help use space well, keeping essentials handy.
Woodworking fans might like adding a miter saw station or clamp system to their bench. It makes switching tasks easier without moving things around.

Want to make your bench stand out? Try staining, painting, or adding decorative hardware. You could even use a pegboard backsplash in a different color.
These garage workshop bench ideas will help you create a space that’s both useful and looks good. Whether you’re into woodworking or just need a place to work, you’ll find inspiration here.
Conclusion
Building a sturdy garage tool bench is a rewarding DIY project. It can change your workspace and make you more productive. Follow the guide and use the ideas from this article to create the perfect bench for your tools.
Get ready to make your garage work better. This will help you do more DIY projects.
The garage tool bench ideas and strategies here will help you make a custom workspace. You can improve tool organization, make your workstation better, or make your garage look nicer. This guide has everything you need.
Building your own tool bench garage lets you control your workspace better. A good bench makes DIY projects easier. You’ll keep your tools organized and work more efficiently.
So, start now. Get your materials ready. Turn your garage into a place of creativity and productivity.